How to detect water leaks and do home inspections with thermal imaging
Hidden water leaks and moisture infiltration can silently wreak havoc on your home, causing structural damage, mold growth, and costly repairs. Traditionally, detecting these hidden threats often meant destructive testing, tearing into walls and hoping for the best. But what if you could see through walls and pinpoint the source of the problem non-destructively? Enter thermal imaging cameras, a powerful tool that can revolutionize the way you approach home inspections and moisture detection.
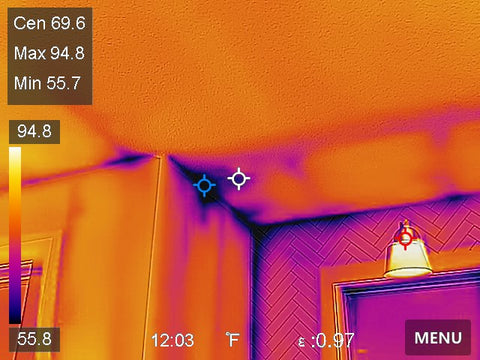
While humidity, condensation, and even your breathing can contribute to building moisture, leaks and heavy condensation pose the real threats. Unfortunately, these problems often hide behind walls, ceilings, and floors, making traditional detection methods challenging. Thankfully, thermal imaging steps in, offering a glimpse into the unseen world.
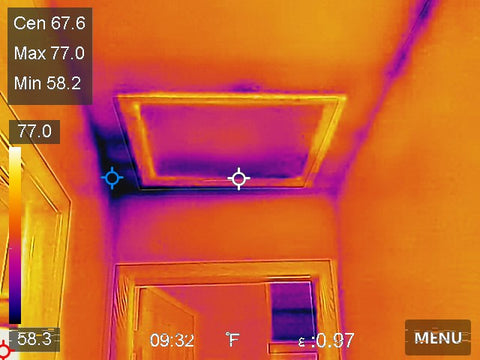
Thermal Imaging Technology picking up water leaks (Hikmicro Pocket2)
However, thermal imaging is not a magic bullet. While it can effectively locate water and approximate the moisture extent, it's crucial to confirm these findings with a moisture meter. This is because various factors, besides water, can cause temperature differentials. Combining these tools provides a comprehensive and reliable assessment of your home's moisture situation.
When choosing a thermal camera for moisture detection, high resolution and thermal sensitivity (NETD) are key. A lower NETD value (like 30mK) allows for visualization of even the subtlest temperature differences associated with moisture. Additionally, cameras with manual image adjustment capabilities offer greater control over image interpretation, ensuring optimal moisture pattern visualization.
Popular choices for moisture detection include the Hikmicro Pocket 2 for basic applications, and the Hikmicro M30 and Hikmicro G60 for those seeking higher resolution. Remember, consulting a qualified professional trained in thermography is crucial for accurate interpretation of thermal images.
Taking your time during inspections is also essential. Various factors, like weather conditions and interior humidity, can influence water detection with thermal imaging. To truly unlock the full potential of this technology, consider taking a thermography course offered by the Infrared Training Center. This will equip you with the knowledge and skills to confidently utilize thermal imaging for home inspections and moisture detection.
By embracing thermal imaging, you can unveil the hidden threats lurking within your home, prevent costly damage, and ensure a safe and healthy environment for your family. So, the next time you suspect a water leak, consider the power of thermal imaging and take control of your home's health.
Here's how you can leverage thermal imaging for water leak detection and home inspections:
Water Leak Detection:
-
Gather your tools: Choose the right thermal imager for the Job.
-
Understand the limitations: Thermal imaging detects temperature differences, not water directly. This means other factors like sunlight or recent use of plumbing can influence readings.
-
Choose the right time: Conduct inspections during the cooler hours of the day, preferably in the evening when the temperature differential between leaks and surrounding areas is greatest.
-
Start outside: Begin by inspecting the exterior walls, focusing on areas around faucets, pipes, and the foundation. Look for cold spots that could indicate leaks within the walls.
-
Move indoors: Inspect bathrooms, kitchens, and laundry rooms, paying close attention to walls around pipes, showers, sinks, and appliances. Look for cold spots or irregular temperature patterns that might suggest hidden leaks.
-
Confirm your findings: While thermal imaging can provide valuable clues, **always ** verify with a moisture meter to confirm the presence of water.
Home Inspections:
- Invest in training: While DIY leak detection is possible, consider taking a basic thermography course to understand how to interpret thermal images accurately.
- Focus on key areas: Use the camera to inspect insulation efficiency by looking for cold spots indicating heat loss, potential electrical issues by identifying hot spots on circuit breakers or outlets, and roof leaks by looking for cold spots during colder weather.
- Remember, it's a supplement: Thermal imaging is a valuable tool, but it doesn't replace a professional inspection. Use it to complement a thorough visual inspection for a more comprehensive understanding of your home's condition.
Visit Cape thermal and let us help you find the right tools to do water leak detection as well as home inspections.